Your first episode in Frame
From the folder of camera and audio files to an edited episode with your client, one card at a time.
Frame works through the edit for you, inside DaVinci Resolve Studio. It shows one card at a time: what happens next, and one button to do it. You check the result at the points that need a person, and Frame does the rest. Before you start, install Frame and set up Resolve.
Along the top, a line of seven stages shows where the episode is: Add footage, Sync, Build in Resolve, Review cut, Send to client, Apply notes and Deliver. Click a finished stage to look back at what was decided there.
Everything Frame does is also in the full panel. Turn on the Advanced switch at the top right to see every step, and turn it off to come back to the card. To move to another episode, click the episode's name in the title bar and pick a recent one, or Open another folder.
1. Add footage
- Choose New episode, then Choose this episode's folder: the folder with every camera's files and the audio recorder's tracks. Frame reads the files where they are and never copies or moves one.
- Frame reads the folder straight away and shows Check what Frame found, then start.
Choose each camera's sound
The card lists every camera, with a still from it and its name, under Camera, Sound from and Wide angle.
For each camera, choose under Sound from:
- the recorder track of the person it shows, for a camera on one person;
- Its own audio, for a remote guest's video that carries their own sound;
- No sound (wide or cutaway), for a camera that only adds pictures.
Every camera starts on Pick this camera's sound, and Looks right, start waits until each one has a choice. Press Hear 5s beside a choice to play five seconds of that sound and check it is the right person.
If you pick a track that another camera already has, the two cameras swap sounds, so no person ends up on two cameras.
Tick Wide angle on the camera that shows everyone. That camera may take more than one track; every other camera takes one. A track no camera uses is listed under Not on a camera, with its own Hear 5s, and is left out of the cut.
If a camera's name is wrong, choose Change a name.
Choose the client
Under Which client is it for?, pick the Send client this episode is for. The last client you chose is already picked. If that client's default template on Send has no Approval stage, the card says so here, before anything is rendered: add one in Send, or choose another client. You can change the client until the episode's job is on Send.
Choose Looks right, start. Frame lines up the cameras and mics on its own.
2. Sync
Frame listens to every camera and mic, lines them up, and uses every offset it is sure of. In the look back it says how sure it is of each: Certain, Very likely or Likely.
If a camera may be out of sync, you get A camera may be out of sync, with Play them against the audio, which opens the cameras and mics lined up so you can check and nudge one by hand.
3. Build in Resolve
The Build the episode in Resolve card has two choices for this episode.
Reaction shots decides how often the cut moves to someone listening:
| Choice | The cut |
|---|---|
| None | Never cuts to a listener. A long stretch only moves to another angle of the person talking. |
| A few | The studio's usual: a listener who reacts, now and then. |
| More | Reactions sooner and more often. |
Audio picks the audio preset, Studio 808 chain or Resolve built-in. The Studio 808 chain is only offered on a Mac with its plugins; see installing Frame.
Both start from the studio's default, set in the Advanced view's Cut panel, and a change here is for this episode only.
Choose Build in Resolve. Frame opens Resolve, makes the project from the studio template, puts every camera and mic on the timeline, makes the cut, lays it on the timeline and checks it for black moments. If any moment would be black, you get Some moments in the cut would be black, with a button to show them in Resolve.
If Resolve already has a project with the episode's name, Frame asks: Replace it overwrites the old project, and Keep both builds this one beside it as "episode (2)".
4. Watch the cut
Watch the cut, then approve it. The cut is on the timeline in Resolve: watch it there, and make any edits by hand there before you approve. Change who is on screen opens the cut in the Advanced view.
Grading
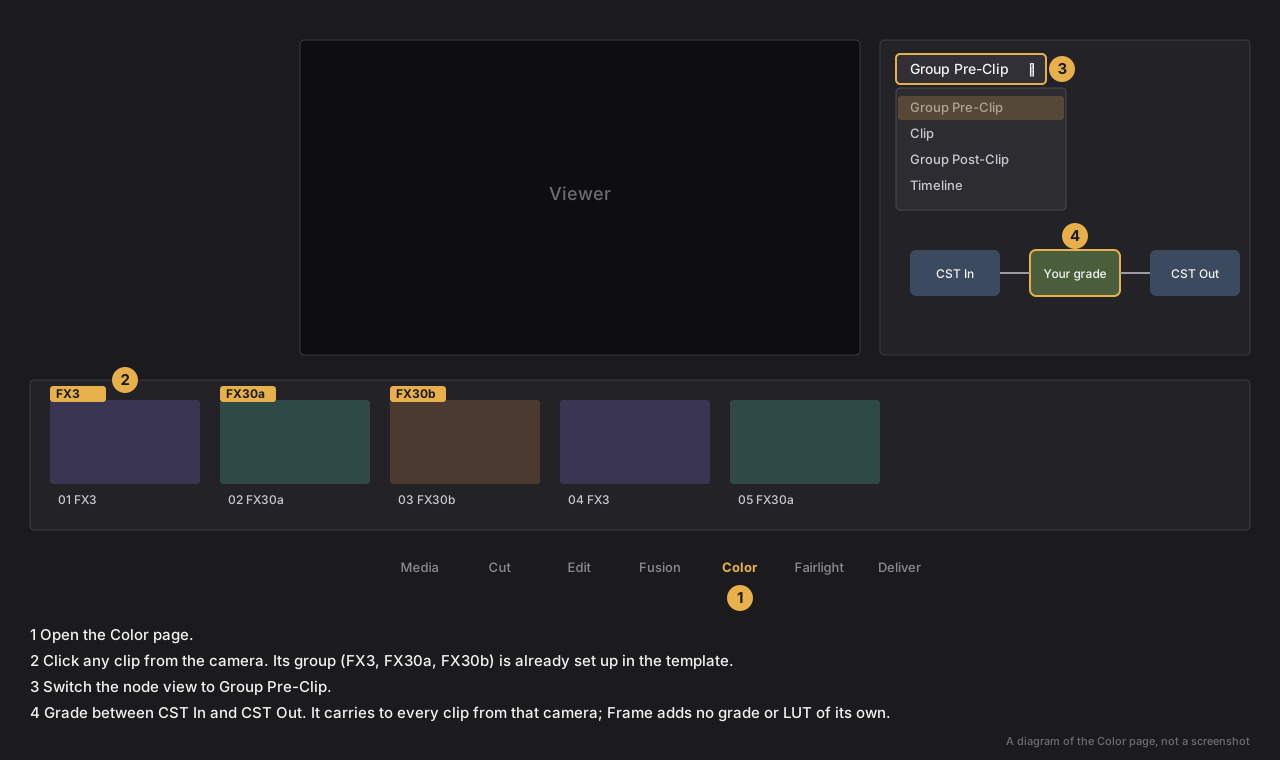
Grade each camera once in its Group Pre-Clip, and it carries to every clip from that camera. The studio template already has a group for each camera, with CST In and CST Out nodes in its Group Pre-Clip. On the card, Open in Resolve opens the Color page, and Show me where shows the diagram below.
- Open the Color page in Resolve.
- Click any clip from the camera you want to grade.
- Switch the node view from Clip to Group Pre-Clip.
- Grade between the CST In and CST Out nodes.
Frame never adds a grade or a LUT of its own.
Sound
Under While you watch, tick Sound is balanced once you have listened. It is a reminder and doesn't stop you approving. The loudness is set when the episode file is made (see the next step).
Choose Approve the cut. Frame records your name and the time.
5. Send for review
Send the episode to client for review. Choose Send for review and Frame:
- makes the episode file in Resolve, at the episode's own frame rate and size, with Frame's render preset, which sets the sound to -16 LUFS and keeps peaks at or under -1 dBTP;
- checks the file for black picture, silence and loudness;
- finds the client's open job named after the episode on Send, or makes one from their default template;
- uploads the file, and your client gets an email with a link to watch and leave notes.
Rendering and uploading take a while. Frame keeps the Mac awake until it is done; keep it plugged in if you close the lid.
If the file's loudness is more than 1 LU from -16 LUFS, or it peaks above -1 dBTP, you get The sound isn't at the studio's loudness, with Make it again or Send it as it is.
6. Notes
While your client reviews it, the card says Waiting on client, and you can start another episode. Frame checks Send for notes every few minutes and tells you, with a notification, when they arrive. How notes are applied and version 2 is made is in client notes and version 2.
7. Deliver
Once your client approves a version, Send asks them to pay, then releases the files. The card follows along (Waiting on client) and ends on Delivered.
If the client ordered social clips with the episode, Send passes the job back to you before approval to make them; see clips in Frame.
When something stops
Anything that stops a step is one card with one button to fix it: red when the episode can't go on, grey when it is worth a look. See when Frame shows a problem card.
Credits
Frame comes with 1,000 credits a month. Suggesting clips for an episode uses 300; nothing is charged if it fails. If you need more, packs start at £10 for 1,000. Everything else runs on your Mac and uses no credits.